No rice cooker? No problem! Learn how to make a pot of Japanese rice on the stove. My simple tips and tricks will ensure that your steamed rice comes out perfectly every time.

Do you use a rice cooker to make rice or do you cook rice the traditional way in a pot? In this post, let’s get back to basics and I’m going to show you how to cook Japanese rice in a pot on the stove.
Table of contents
Growing up in Japan, where rice is a staple food and the primary source of protein, cooking rice is not only just a basic kitchen task but an extremely important one. While an electric rice cooker with all the bells and whistles seems to be an essential kitchen gadget in most Asian kitchens, I know not everyone eats rice on a daily basis and may not own a rice cooker. It’s also handy to know how to make rice over the stove in case your rice cooker breaks out of the blue or you’re craving rice while camping.
What Type of Rice to Use for Cooking Japanese Food
Japanese rice is a type of Japonica short-grain rice that is short, plump, and rounded oval. It’s worth noting that outside of Japan, Japanese rice is often labeled as ‘sushi rice’ for marketing purposes. However, rice is used not just for making sushi, but also for everyday Japanese dishes.
What makes Japanese rice different from long-grain rice such as basmati or jasmine rice is its high water content, which means the texture is more tender and moist. The grains contain less amylose—a type of starch that separates rice grains— than the long grains, which gives it a more sticky chewy texture.
When cooked properly, the rice grains cling to each other without being mushy, allowing you to pick up the rice easily with chopsticks. You would also notice a beautiful glossy sheen on the surface of the rice. These unique characteristics of Japanese short-grain rice are important because they allow us to make dishes like onigiri and sushi that need to stay in one piece.
Sometimes I hear people calling Japanese rice “sticky rice” due to its sticky texture, but please know that ‘sticky rice’ is technically a different type of rice known as Japanese sweet rice (or glutinous rice) used for making mochi (rice cakes).
👉🏻 To brush up your knowledge, I highly recommend reading “Everything You Need to Know about Japanese Rice” and “Types of Japanese Rice“.
My Favorite Japanese Rice Brands
When it comes to high-quality Japanese rice, I would recommend the Koshihikari variety which is available in various brands at Japanese grocery stores. Known for its sweet taste and fragrance, it is the most popular variety in Japan.
For US-grown koshihikari rice, look for Shirakiku Rice, Tamaki Gold, and Tamanishiki Super Premium Short Grain Rice. For brown rice, we enjoy Genmai Sukoyaka Brown Rice and Koshihikari Premium Sprouted Brown Gaba Rice.
There are also other new cultivars such as Hitomebore, Akitakomachi, Tamanishiki, Tsuyahime, and so on. Each of them has unique characteristics that are different from Koshihikari.
Various Methods for Cooking Japanese Rice
There are different methods to cook Japanese rice at home. Each method has its own advantages and Japanese households often own a few cooking pots/gadgets for different occasions and needs.
- How to Cook Japanese Rice in a Rice Cooker
- How to Make Japanese Rice in an Instant Pot
- How to Cook Japanese Rice in a Donabe (Earthenware pot)
- Instant Pot Brown Rice
The Rice-to-Water Ratio for Short-Grain Rice
It’s very important to remember:
The Japanese golden rule for rice to water ratio [volume] is 1 : 1.1 (or 1.2).
That is 10-20% more water than 1:1 ratio.
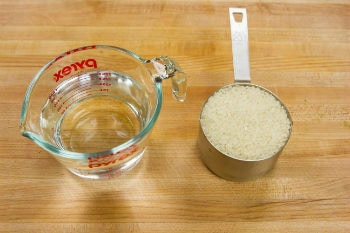
For 1 rice cooker cup (180 ml) of uncooked short-grain rice, you will need 200 ml of water.
For a US measuring cup (240 ml), however, I use 1:1.25 ratio so that you can measure water using a US cup. So, for 1 US cup of uncooked short-grain rice, you will need 1¼ cups of water.
If you still want to use the golden rule of 1:1.1 ratio, for 1 US cup (240 ml) of uncooked short-grain rice, you will need 264 ml of water.
5 Important Tips When Cooking Japanese Rice
Here are 5 main tips to cook a perfect pot of glossy and tender Japanese rice:
- Wash and rinse the rice. We always start by quickly rinsing and washing the rice a few times to help remove the natural occurrence of arsenic and impurities.
- Use a heavy-bottom pot with a tight-fitting lid that keeps the steam in. If your lid fits loosely, put a clean kitchen cloth between the lid and the pot.
- Always soak the rice in water for 30 minutes. Rice has been sitting in the bag dried after milling, hence it needs moisture to revive the texture. It’s important that you give it enough time for rice to absorb water so that rice has a perfect texture after it’s cooked.
- DO NOT open the lid while cooking! That is a big no-no when it comes to cooking Japanese rice. I learned from my experience to catch the indication of “boiling” by sound. However, until you do, it’s okay to “quickly peek” inside to see if it’s boiling.
- Rest and fluff. Once the rice is cooked, let it rest for 10 minutes to steam fully and then fluff to help evaporate the excess moisture.
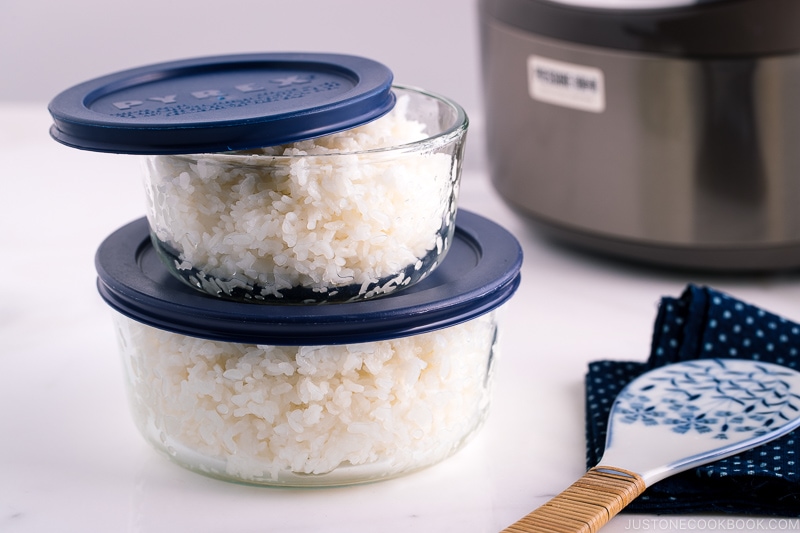
The Best Way to Store Cooked Rice
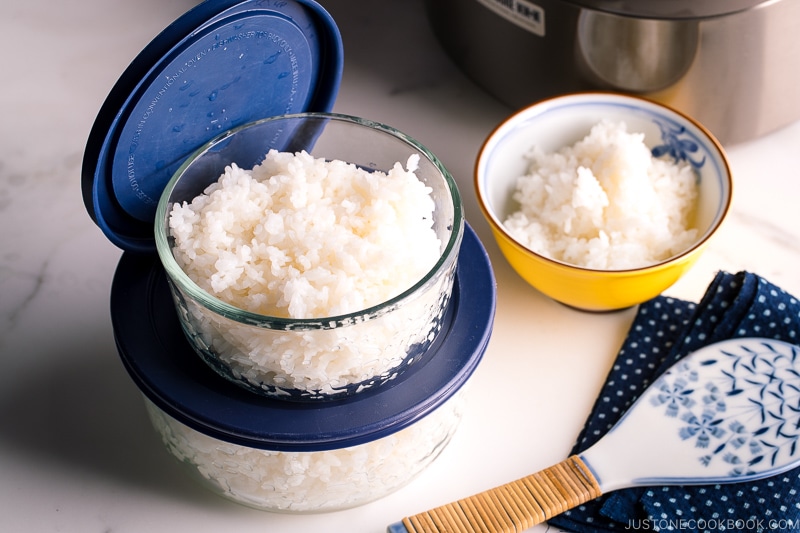
Wondering how to store the leftover rice? Here’s what I do: freeze the rice! If you already know how much rice you will be using, then pack away the unused cooked rice immediately to seal in the moisture. Be sure to let it cool before freezing.
To reheat the rice, place it in a covered (but not sealed) microwave-safe container and warm it through.
Wish to learn more about Japanese cooking? Sign up for our free newsletter to receive cooking tips & recipe updates! And stay in touch with me on Facebook, Pinterest, YouTube, and Instagram.
How to Cook Japanese Rice in a Pot on the Stove
Video
Ingredients
For 2 Rice Bowls (2¼ cups, 330 g cooked rice)
- ¾ cup uncooked Japanese short-grain white rice (1 rice cooker cup, 180 ml)
- ⅞ cup water (200 ml)
For 4 Rice Bowls (4⅓ cups, 660 g)
- 1½ cups uncooked Japanese short-grain white rice (2 rice cooker cups, 360 ml)
- 1⅔ cups water (400 ml)
For 6 Rice Bowls (6⅔ cups, 990 g)
- 2¼ cups uncooked Japanese short-grain white rice (3 rice cooker cups, 540 ml)
- 2½ cups water (600 ml)
For 8 Rice Bowls (8¾ cups, 1320 g)
- 3 cups uncooked Japanese short-grain white rice (4 rice cooker cups, 720 ml)
- 3⅜ cups water (800 ml)
For 10 Rice Bowls (11 cups, 1650 g)
- 3¾ cups uncooked Japanese short-grain white rice (5 rice cooker cups, 900 ml)
- 4⅛ cups water (1000 ml)
Instructions
- Before You Start: Please note that Japanese short-grain white rice requires a soaking time of 20–30 minutes. The rice-to-water ratio is 1 to 1.1 (or 1.2) for short-grain white rice. Also note that ¾ cup (150 g, 1 rice cooker cup) of uncooked Japanese short-grain rice yields 2¼ US cups (330 g) of cooked rice. This is enough for 2 Japanese rice bowls (typically 150 g each) or 3 onigiri rice balls (typically 110 g each). 1 cup of cooked rice weighs about 5.3 oz (150 g).
- How to Measure: Overfill a US cup measure (a ¾-cup measure works well for this) or a rice cooker cup with uncooked short-grain rice and level it off. Put the rice in a large bowl. Repeat until you have the measured amount of rice needed. Note: For this recipe and video, I used 2 US cups of short-grain white rice.
To Wash the Rice
- Quick Rinse: Add just enough tap water to the bowl to submerge all the rice. Then, discard the water immediately. Repeat. Tip: Rice absorbs water very quickly when you start rinsing, so this quick rinse helps remove impurities from the rice and prevent it from absorbing the first few rounds of milky water.
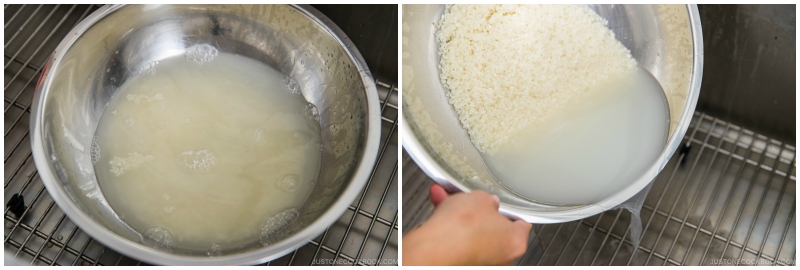
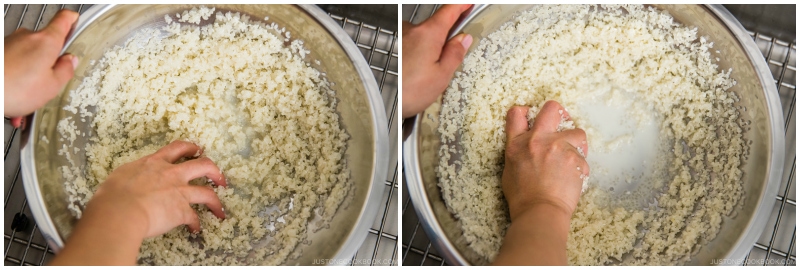
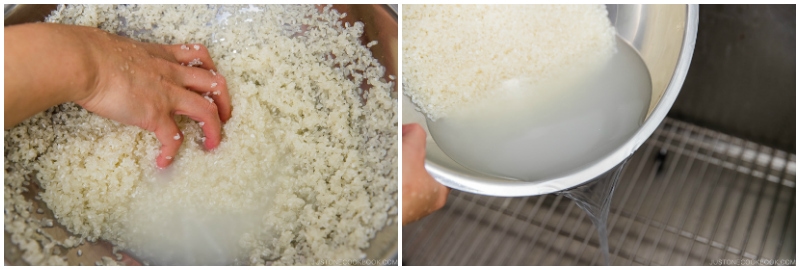
- Wash: Next, use your fingers to gently agitate the wet rice grains in a circular motion for 10–15 seconds. Tip: Using very little water allows the grains to rub against each other. It also reduces the absorption of impurities from the milky water.
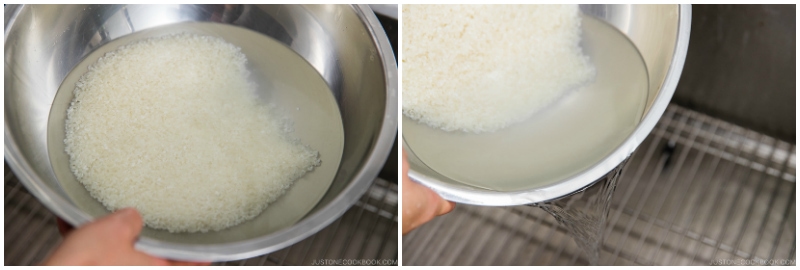
- Rinse: Add tap water and immediately discard the cloudy water. Repeat.

- Repeat Wash and Rinse (steps 2 and 3) two more times.
- Drain: When the water is almost clear, drain the rice completely. Tip: Use a fine-mesh sieve to drain and shake off any excess water.
To Soak the Rice
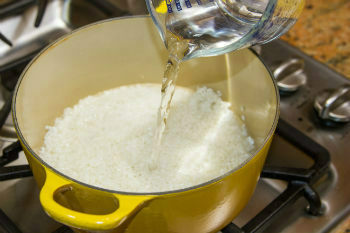
- Put the well-drained rice and measured water in a heavy-bottomed pot with a tight-fitting lid. For example, if you‘re cooking 1½ cups uncooked Japanese short-grain white rice (2 rice cooker cups), add 1⅔ cups water (400 ml). Soak the rice for 20–30 minutes before cooking.
To Cook the Rice
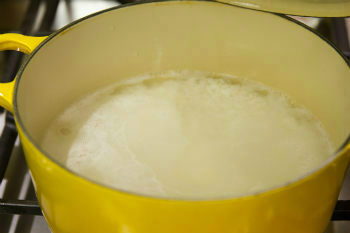
- Cover the pot with the lid and bring it to a boil over medium heat. Take a quick peek to see if the water is boiling (otherwise do not open the lid).
- Once the water is boiling, turn the heat to low and cook, covered, for 12–13 minutes, or until the water is completely absorbed (take a quick peek). If there‘s water left, close the lid and cook for a little longer.
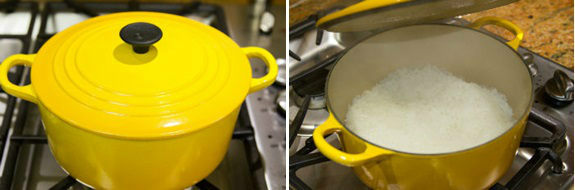
To Steam the Rice
- Remove from the heat and let it steam with the lid on for another 10 minutes. Tip: This resting period is crucial for the rice to steam properly. Resist the urge to peek under the lid and release the steam during this time.

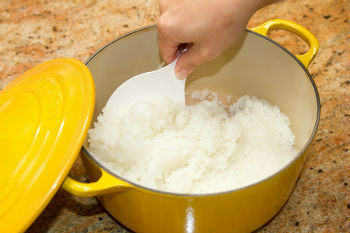
- After 10 minutes, uncover the pot and fluff the rice with a rice paddle. It‘s now ready to serve.
To Store
- Transfer the rice to airtight containers and close the lids to keep the moisture in. Let cool completely before storing the containers in the freezer (read my tutorial post).


I made おにぎり in school the other day. I loved it and wanted to make it at home. But I was told that you have to use sticky rice. This recipe was really helpful. Thank you so much.
Hi Barney! The confusing part is that many people think Japanese short grain rice is “sticky rice” because compared to long grain rice each rice is stickier. However, the real “sticky rice” is glutinous rice (or sometimes called sweet rice) and it’s different from Japanese short grain rice. When you look for rice for Onigiri or Japanese food, I recommend to use the word “short grain rice” or Japonica. Hope this helps!
It would take a very long time to use this recipe to make rice. 45 minutes is too long for me. Hungry children don’t want to wait. Is there a shorter way? Please reply to my needy question. Thank you very much
Hi Hello! If you worry that your children can’t wait for the rice to be ready, you can rinse, soak, drain rice much ahead of time. I usually do that in the morning. Since I use a rice cooker, I set a timer for 6 pm, and the rice is automatically ready.
Hi, I love your recipes they are so delicious! And the tutorials you have are great.
I am in Israel and am having a hard time finding sushi/Japanese rice.
Can I use regular brown or white rice to make sushi? will it come out like your rice if I follow your instructions, or does the type of rice make a huge difference?
Thanks!
Hi Rachel! I’m so happy to hear you enjoy my recipes and thank you for following my blog/videos! You really need short grain rice to make sushi if you want to make rolls or nigiri sushi. Rice will fall apart otherwise. Short grain rice has the right kind of moisture and stickiness (not sticky like glutinous rice). Hope you can find online, maybe?
Hi Rachel,
I believe short grain ITALIAN rice is the same. It is sticky like Japanese rice. Hope you can find it in Israel.
Thank you Dagmar!
Hello, is it necessary to soak the rice in water for 30 minutes before cooking? Thank you.
Hi Tiffany! I’m not sure about other kinds of rice but Japanese short grain rice, yes. I never seen any Japanese recipe that tells you to skip soaking process…Japanese rice has high moisture content and it’s very important to soak. But I have to admit that I have skipped soaking several times as I was running behind…(and rice comes out drier as expected). Hope this helps!
Hi. I’ve been seeing a lot of pictures comparing Japanese to American food servings (e.g. small Coke at McDonalds in Japan and US) and I wondered what a “normal” serving of plain rice is in Japan. Some sites say 150ml, others 380, more 200. So what is “normal”, and what is “modest” for an adult woman, for example?
Thanks!
Hi Jane! So I just had lunch actually and made ochazuke (I was reading your comment and had sudden craving. :)). In a regular-size rice bowl in Japan (probably consider small for American standard), I put rice just like how I serve normally, and it was about 1 cup. That’s about 240 ml. There are smaller rice bowls or even bigger ones for men. So the amount of rice that can fit in rice bowl varies due to the size of bowls… For modest for an adult woman, I think 240 ml is considered good amount of rice. But this is for typical Japanese rice bowl size. Hope this helps!
Hi Nami,
You shouldn’t wash the rice until the water is clear, since most the goodness of rice is in the skin. Just wash it once or two times to get rid of unwanted particles. By the way, Brown Rice is far healthier than white rice, since it still retained some of the skin.
Hi Linda! These days rice is milled very well, so I don’t think we need to rinse the rice till water is clear. Maybe my choice of words was not right. I removed “till water becomes almost translucent” but I usually rinse 3-4 times. Thank you so much for your feedback! I really appreciate it! I agree about brown rice. 🙂
Hi Nami:
I’ve been enjoying your recipes, and have a question about the of water:rice ratio. Is it always 1/4 C. water more than the amount of rice? For example, with 1/2 C. rice do you add 3/4 C. water? For 2 C. rice is it 2 1/4 C. water? Thanks.
Hi June! Thank you so much for reading my blog! The basic is that you need the same volume of water as the volume of soaked & drained rice (so in a way, measuring cup is not necessary and you can just use a regular cup, for example, to measure volume of soaked & drained rice, then add the same amount (volume) of water to the pot. Ratio should be around 1 cup: 1 1/4 cup water. However, each rice (brand of rice, type of rice) absorbs different amount of water, and you need to adjust according to your rice. Hope this helps! 🙂
What went wrong when my rice broke after cooking and fluffing. Too much water?
Hi Darren! I did a little bit research and found out a few reasons why the rice could be broken.
1) Rinse the rice too harsh (for example, don’t wash in sieve).
2) Drain the rice for too long. No more than 15 minutes. When the rice dries out completely, rice may be broken.
3) Didn’t soak rice in water for long enough.
I don’t think too much water was the reason for this. It’s more likely that rice was already broken before you started to cook? Hope this helps. 🙂
The video was great !
I’ve always cooked rice on the stovetop as I don’t have room on the counter for a rice cooker though I have dreamed of having one. There are so many kinds of rice to try. I enjoy all of the variety.
Hi Kathleen! Thank you for watching my video! I’m dreaming of having a slow cooker but I don’t have a room on the counter or in the cabinet…so I know what you mean. 🙂 Thanks for writing!
I know this may sound weird, but I cook rice in the microwave! I used to do it on the stove but i kept burning the bottom, and have to keep an eye on it. With the microwave I just kinda shove it in for about 20-30 mins and its done. It works well, but its probably not as good as the proper way. But I like cheating when it comes to cooking (^-^)
Hi Lava! REALLY?!?!? I’ve never heard of it before!!! And I don’t think I turn on the microwave for more than 5 minutes. 😀 I didn’t know microwave can actually cook food for such a long time. Thanks for sharing your trick!
Yup! it works really well, kinda like a rice cooker. I just use a pyrex dish, and make sure the lid isn’t on otherwise it will overspill (^^;)
Thanks for making this video, Nami and Mr. JOC. Sorry to hear your hand was a little burnt.
The video was very informative. I’ve always wanted to learn how to cook rice on the stove.
Thank you so much Candice! I’m glad it was helpful, and thanks for your sweet words. 🙂
Thanks for sharing these tips on cooking rice without a rice cooker! I usually only make rice on the stove when preparing rice congee, so this is new to me. I’ve learned to listen for the sound of boiling water as well, though I have to admit, there have been a handful of accidents when I wasn’t paying the proper attention… =)
I hope that your hand is okay from after the filming — but the video is so helpful and fun to watch!
Hi Kimmi! Me too, sometimes I try to multi-task and forget about paying attention to boiling sound. 😀 Thank you so much for your kind words. I’m happy to hear you like my videos and thank you for watching!
Thanks for showing the way to cook rice on the stove. Most of us do not know how as it is very convenient to cook rice just by using the rice cooker. I have forwarded this link to my daughter. Sorry to notice your “red hand” though.
Hi Chrissie! Thank you so much for sharing my post with your daughter. 🙂 It’s pretty simple instruction in case we cannot use the rice cooker. It’s so convenient to use the rice cooker that I rarely need to use a stove top method. But once in a while it’s a nice change and we enjoyed it while I had to make rice this way for photo and video shooting. I should do this more often! 🙂 Thank you for your kind words!
Hi Nami, I’m new to Japanese cooking, so everything is trial-and-error at this point. But it’s fun! The thing is, when I cook, I try to take the manual or old-school route. I try to build my ingredients instead of getting ready-made ones, where possible. And when I’m not lazy! When it comes to rice, I normally use the steaming method. I’ve worked out the rice-water ratio for the rice I normally use (Thai fragrant rice) but, when it comes to Japanese short-grain rice, do I keep the same rice-water ratio and cooking times per your recipe or is the technique slightly different for steaming Japanese rice? Thanks Nami, and keep up the great work! Cheers.
Hi Steven,
We steam glutinous rice in Japan, but we don’t steam regular short-grain rice. Sorry, we wish we had an answer for you…😞
I know how to cook rice, in our country, we eat rice in every meal, now that I’m here in USA, I used to cook rice in a rice cooker, also I cook rice in traditional hargd bottom pot that came from my country, I want to eat the burned bottom rice I let stay longer in top of oven, I want to try to cook Japanese rice if I can found here where I live. One more thing do you know or is there another wayf cooking brown rice?
Hi Oscar! I don’t usually cook brown rice, so I’m not familiar with the best way to cook it. I also love burned bottom rice! So delicious. 🙂
I’m from Singapore and I make brown rice on the stove everyday. The trick to fluffy brown rice is to PRE SOAK the rice for at least 30 mins before cooking. I dun use a measuring cup becos my mum’s method always works: the water needed is half a digit of your middle finger, measured from the top of the presoaked rice. Your middle finger should barely touch the surface of the rice. The rice will cook within 20 mins. When u see there’s no more water at the bottom of the pot (I use wmf 14cm mini pot and yes I always peek!), turn off the stove and let it sit until it’s time to eat. This time, never peek if u want a pot of fluffy rice! Enjoy!
Hi Chin! Thank you very much for sharing your cooking tip with us! 🙂
I can help with that Oscar. Ratios for brown rice are 2:1. 2 cups of water to every 1 cup of brown rice. I have never washed it before putting it into the boiling water. It takes about 40 minutes to cook and I add 1 tsp of chicken bouillon for every batch while it is cooking. You can also add dried herbs – oregano for instance. Watch it closely towards the end, but like Nami said, do not take the lid off unless you absolutely have to. And you want to use the correct size of pot for the amount of rice you are using so that the rice fills the pot when it is done. I don’d know about the science behind it, but it makes a difference. I am so excited to make authentic Japanese rice stovetop!! Thanks for the posting Nami.
Hi Nikki! Since the time I left the comment to Oscar years ago, I cook brown rice frequently now, but mostly in my rice cooker (https://www.justonecookbook.com/how-to-make-rice/). I’ll try to update how to cook brown rice on the stovetop sometime in the future. 🙂
You make rice just like my mom did:) what brand of rice do you use?
Hi June! So sorry for my late response. I like Koshihikari most, and buy rice from Far West Rice (but very limited places carry their rice). Japanese grocery stores carry Koshihikari, and that’s what I’d recommend. 🙂